A roll with 500 square feet printed on the label doesn’t automatically cover every 500-square-foot space. Its width, the direction you lay it, overlaps and edge details all affect how much useful coverage you get.
Use the membrane roll-layout calculator after the correct material and assembly have been specified. The tool’s name includes DPM and vapour barrier; those terms don’t make every moisture-control sheet interchangeable. This guide is about measuring and ordering the specified membrane, not choosing where it belongs in a wall, floor or roof.
Start with the product’s job
Write down the exact product and intended application before entering dimensions. A below-slab vapor retarder, a wall vapor-control layer, a breathable weather barrier and a gas-resistant membrane can have different requirements. Similar-looking rolls are not enough evidence that one can replace another.
Stego’s installation resources separate instructions for different products and applications. Use the instructions matching your material to establish seams, terminations and penetrations. For example, its StegoHome below-slab instructions show a minimum 6-inch overlap for that system. That is product-specific guidance, not a universal setting for every membrane in this calculator.
The same distinction applies to tape. The fact that a roll of tape sticks to a sample today doesn’t establish its compatibility or intended service. Use the specified sealing components and keep their quantities visible on the order.
Measure a zone and draw the strip direction
Sketch the width and length of each continuous zone, then mark which way full-width strips could run. Include any developed material needed at the edges. If different edges need different extensions, prepare dimensions that encompass the actual detail and make that assumption clear in your notes.
The calculator’s edge input adds the same extension at all four sides. Zero means no edge material is added. That can be appropriate for a stripped-down arithmetic example, but it isn’t permission to omit the perimeter detail on the real project.
Check the fully opened roll width. A folded roll’s delivered package width may be much smaller. Also distinguish the roll’s full usable length from a short leftover piece; entering the original label length for a partly used roll overstates the available material.
See what one roll can actually make
Take a rectangular zone 16 feet wide by 20 feet long. Its area is 320 square feet. Suppose the specified material comes in a fully opened 10-by-50-foot roll. For this worked layout, use a hypothetical half-foot side overlap and no edge extensions.
Cut two 20-foot lengths from the roll. The first strip covers 10 feet of width. The second adds 10 minus 0.5, or 9.5 feet, after the side lap. Together they span 19.5 feet, enough to cover the 16-foot zone with width trimming. The two cuts use 40 feet of roll length, leaving 10 feet.
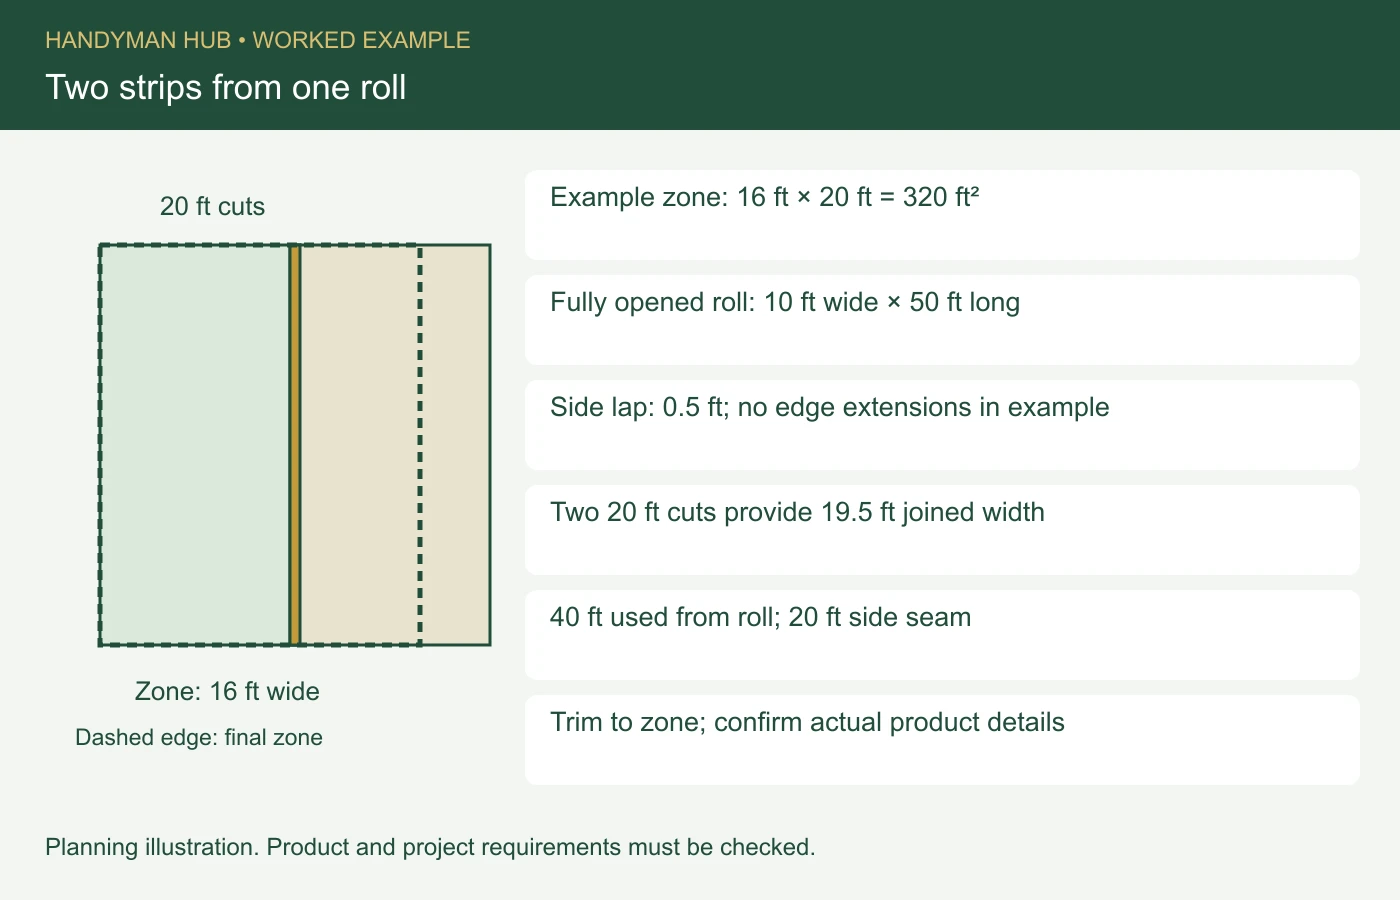
The live calculator reports one roll, two strips and a 20-foot side seam for those inputs. In Imperial mode, enter zone width 16 and length 20, roll width 10 and length 50, side overlap 0.5, end overlap 0.5 and edge extension zero. Automatic direction chooses the along-length arrangement here. No end join is needed because each strip fits in one roll-length piece.
The purchased roll contains 500 square feet, but don’t describe the difference from 320 as one neat reusable offcut. It includes the side overlap, width trimmings and a remaining full-width length. Their shapes—and whether reuse is permitted—matter more than their combined area.
Check the seams before accepting an automatic direction
The calculator compares directions using roll counts and estimated seam lengths. It can’t see required support positions, approved joint locations, access restrictions or a directional product requirement. If the specification dictates a laying direction, select that direction even if another uses less material.
Long zones may need end joins as well as side joins. Enter both overlap types correctly. A larger overlap reduces the extra coverage provided by each additional piece, and can push a layout into another roll. This is why adding a flat percentage to floor area is less informative than drawing the strips.
Separate zones and copies receive separate roll allocations. The tool doesn’t freely move every offcut between rooms, and its cutting arrangement isn’t a guaranteed minimum-roll solution. If a more efficient layout is possible, document the usable pieces and verify the seams before reducing the order.
Tape follows joints and details
The example’s 20-foot seam provides a starting length for seam tape, before any specified passes or reserve. Perimeter sealing and penetrations are separate jobs. Measure their tape or detail components separately rather than assuming the seam figure includes them.
Keep corner patches, collars and system-specific terminations on the list. Deduct only complete usable matching packs through the owned-stock fields. A roll-area calculation can’t verify that the supplied kit contains every accessory required by the detail drawings.
For a wider floor project, coordinate with the floor material quantities and insulation order. Save the membrane estimate with the marked strip layout. The useful deliverable is a roll count you can explain, plus a sealing list that follows the actual joints.
Featured image: original concept illustration, not a completed Handyman Hub customer project.