The box says it covers 22 square feet. Your room measures 120 square feet. Dividing one by the other is a useful start, but it leaves out the cuts—and the fact that a supplier usually sells whole boxes.
Measure the floor area, add the planned waste allowance, divide by the coverage printed on the exact pack, and round up to a whole pack. The free flooring calculator does that arithmetic and separates the measured area from the amount purchased.
Below are two examples you can reproduce, followed by the less obvious details: L-shaped rooms, what the surplus figure means, why changing the pattern does not choose your allowance, and how to avoid confusing a flooring estimate with a complete installation quote.
Measure the floor that will actually receive flooring
Draw the room and write dimensions on the sketch. A simple rectangle needs its length multiplied by its width. An L-shaped room is often easier to treat as two rectangles that meet without overlapping. Name them “main room” and “alcove” rather than trying to remember which set of numbers describes which part.
Include closets and recesses if they will receive the same flooring. Do not deduct a sofa or another movable piece of furniture. For fixed cabinetry, islands or other permanent fixtures, first establish the intended installation boundary from the flooring instructions and project design. Measure that boundary rather than guessing what will eventually be hidden.
Keep your units consistent. In a decimal-feet field, 10 feet 6 inches is 10.5, not 10.6. Convert inches by dividing by 12. A quarter of a foot is three inches; a quarter of an inch is a very different size. This small check is worthwhile before multiplying two measurements across several rooms.
For a room that is out of square, a neat rectangular sketch is only an approximation. Measure more than one width and length, identify the awkward sections, and obtain a reliable area for the actual shape. The tool totals rectangular entries; it does not trace an irregular outline or produce a plank-by-plank cutting plan.
Find the pack coverage before choosing a waste allowance
Use the square-foot coverage for the exact product, size and pack being ordered. Two visually similar boxes can contain different plank dimensions or quantities. Do not use a rounded retailer headline when the carton or current product listing provides a more precise coverage.
Extra material serves several purposes: perimeter cuts, pieces that cannot be reused in the layout, and any deliberate provision for repairs. Those are not automatically the same allowance. Decide whether a repair reserve is already included so it is not added a second time after the calculation.
Use the product’s instructions and a realistic layout to choose the percentage. For example, CALI’s solid bamboo installation guide suggests allowing 8% for cutting and grading. That is guidance for that product family, not a universal figure for laminate, vinyl or every pattern. Our examples use an illustrative 10% so the steps are easy to follow.
A narrow corridor, diagonal layout or several awkward doorways may produce different offcut opportunities from a square room. A calculator can apply an allowance, but it cannot know whether your particular offcut will fit the next row. A rough row layout is useful when the order is tight or the product is expensive.
How to use the flooring calculator
1. Choose the units and describe the areas
For these examples select Imperial — ft / in / ft² and $ USD. Enter each rectangle’s Length and Width. Use the add-room control for another room or a non-overlapping section of the same room. Check the resulting Room / Area Breakdown against your drawing.
Choose the flooring type that describes the project. That label helps organize the estimate; it does not establish suitability for a bathroom, basement, heated floor or particular substrate. If different rooms use different products, make separate estimates with each product’s own pack coverage and price.
2. Enter pack coverage and wastage
Enter the stated coverage per pack or box in square feet, then your chosen flooring wastage percentage. Optional plank dimensions use inches in this unit system. They are not a reason to ignore the printed pack coverage. Confirm the coverage actually used in the results before ordering.
Selecting Diagonal does not automatically increase the wastage percentage. In our live check, changing the pattern while leaving 10% entered kept the same pack result. Set an appropriate percentage yourself after reviewing the layout. The pattern label is not a hidden layout optimizer.
3. Add prices only if you need them
Choose the appropriate flooring cost basis and enter a price that matches it. Our examples use $55 per pack. Entering a per-square-foot price in a per-pack field produces a plausible-looking but incorrect total. Keep delivery, additional materials and other costs separate so you can see what the estimate includes.
Underlay, baseboard, labour, markup and tax are optional. Leave unused values at zero and check that unwanted options are off. The currency selection is a display choice; it does not obtain prices from retailers or convert a quote from another currency.
4. Calculate, check, then save
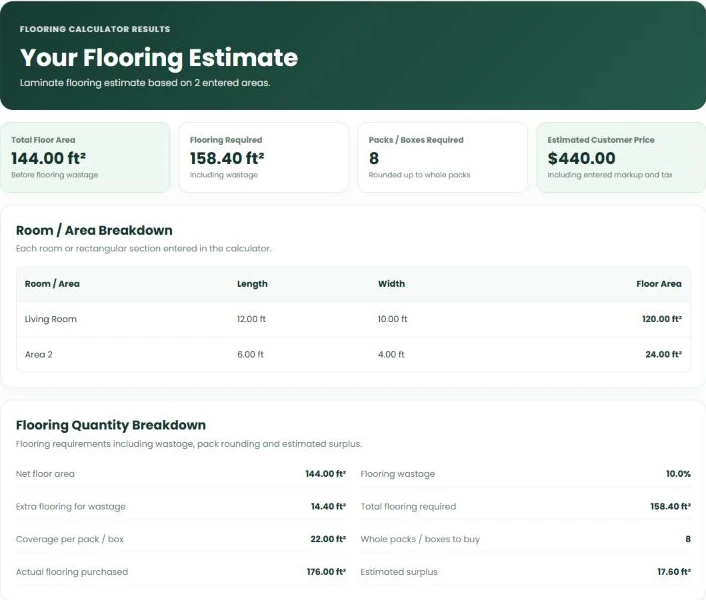
Use the calculation button and review Total Floor Area, Flooring Required and Packs / Boxes Required in that order. The first is the measured footprint, the second includes entered waste, and the third is the whole-pack purchase count. When you change an input, recalculate before saving the estimate.
Use Print / Save Results as PDF for the checked result. Keep the measurements and product details with the printout. A saved number without its pack coverage is difficult to verify if the supplier substitutes a different box size later.
Two worked examples you can reproduce
Both examples use 22 ft² per pack, 10% wastage and a hypothetical $55 per pack. Underlay, baseboard, labour, markup and tax are excluded. These figures were independently calculated and checked in the live tool on September 20, 2026.
| Input or result | Example 1: rectangle | Example 2: L-shaped room |
|---|---|---|
| Area entries | 12 × 10 ft | 12 × 10 ft + 6 × 4 ft |
| Measured floor area | 120 ft² | 144 ft² |
| 10% additional area | 12 ft² | 14.4 ft² |
| Flooring required | 132 ft² | 158.4 ft² |
| Required area ÷ 22 | 6 packs | 7.2 packs |
| Whole packs to buy | 6 | 8 |
| Actual flooring purchased | 132 ft² | 176 ft² |
| Surplus beyond waste-adjusted requirement | 0 ft² | 17.6 ft² |
| Flooring cost | $330 | $440 |
Example 1: a 12 × 10 ft room
Multiply 12 by 10 to get 120 ft². Adding 10% gives 132 ft². Divide by the 22 ft² coverage: 132 ÷ 22 = six packs exactly. At $55 each, the flooring costs $330. No additional pack is created by rounding in this example.
The result’s zero surplus does not mean you bought precisely the bare floor area. You bought 12 ft² more than that area, and those 12 ft² are the entered waste allowance. Zero simply means there is nothing beyond the waste-adjusted requirement from whole-pack rounding.
Example 2: an L-shaped room with a 6 × 4 ft extension
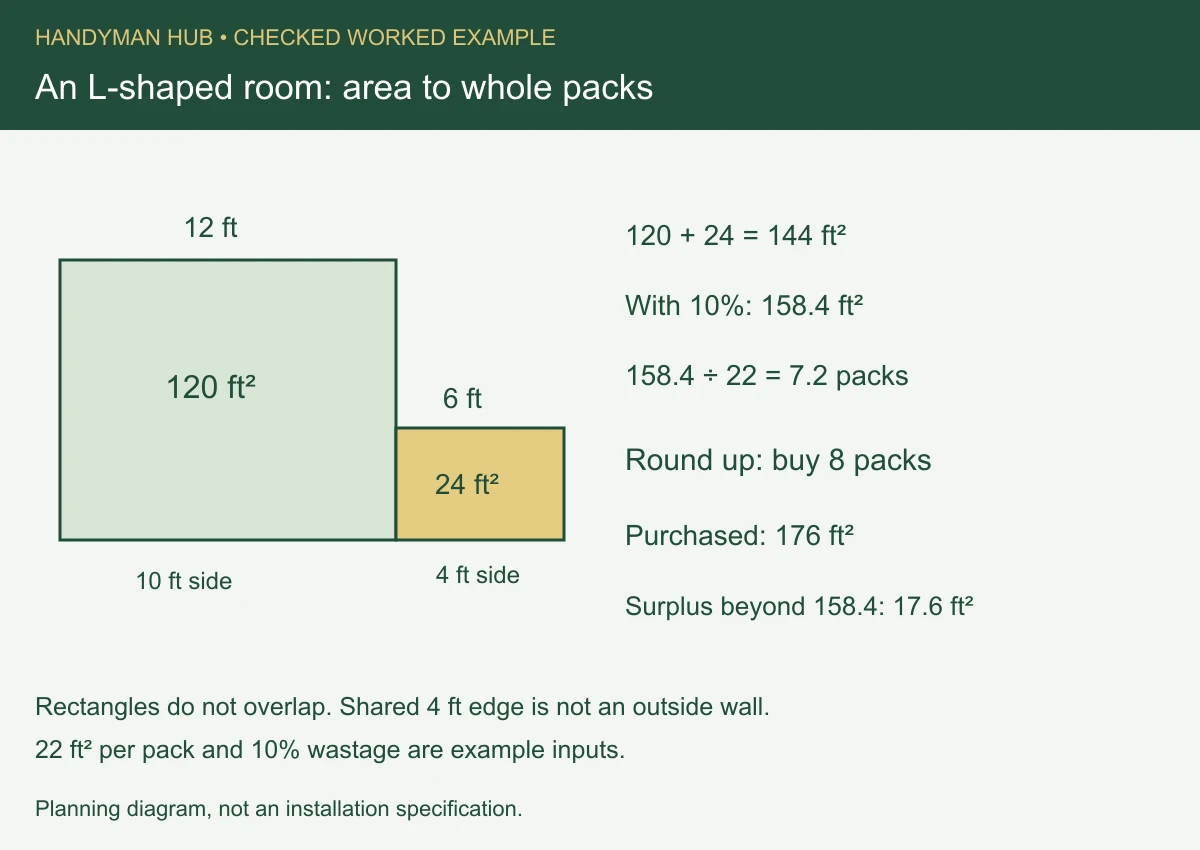
Add a non-overlapping 6 × 4 ft rectangle to the 12 × 10 ft main section. The area becomes 120 + 24 = 144 ft². With 10% added, the requirement is 158.4 ft². Dividing by 22 gives 7.2 packs, so the order rounds up to eight packs, not seven.
Eight packs contain 176 ft² and cost $440 at the assumed price. The calculator’s surplus is 176 − 158.4 = 17.6 ft². Compared with the bare floor, the extra amount is 176 − 144 = 32 ft². Both numbers are correct; they answer different questions.
What to do with a large surplus figure
Whole boxes can create a noticeable jump on a small job. It is tempting to reduce the waste percentage until the result drops a box, but that reverses the planning process. Set an allowance you can justify first; then assess what the rounded order means.
For Example 2, seven packs would contain 154 ft². That exceeds the bare 144 ft² floor but falls 4.4 ft² short of the selected 158.4 ft² requirement. Buying seven would mean accepting a smaller allowance. It is a decision about the actual layout, not proof that the calculator has overestimated.
Surplus is also not a prediction of the pile left after installation. Some of it may become unusable cut pieces. If you want full boards for repairs, plan that reserve explicitly and discuss any unopened-pack return policy with the supplier before purchasing. Do not assume damaged packaging, special orders or opened boxes will be returnable.
Underlay and baseboard need their own checks
The optional underlay estimate uses its own coverage and allowance. Confirm that a separate underlay is permitted and needed for the chosen flooring, especially when a product already includes an attached backing. A quantity field does not select a compatible floor assembly.
There is a particular trap with the L-shaped example: two rectangles give the correct area, but adding their individual perimeters counts their shared edge twice. The 12 × 10 ft rectangle has a 44 ft perimeter and the 6 × 4 ft rectangle has a 20 ft perimeter. If they join along a 4 ft edge, the outside perimeter is 44 + 20 − 8 = 56 ft, before doorway deductions—not 64 ft.
Use actual outside wall runs for the trim order when splitting a single room. The flooring calculator does not know which rectangle edges join. Its optional combined-room perimeter needs that distinction reviewed; do not treat a shared internal boundary as a wall needing baseboard.
Preparation can also sit outside the pack budget. If a specified smoothing layer is needed, our self-leveling compound bag guide keeps that calculation separate. Moisture suitability is another independent check: Wagner Meters explains how moisture affects flooring, including dimensional changes in wood and moisture movement from concrete. Follow the selected flooring system’s testing requirements before installation.
Four quick checks when the result looks surprising
- Too many packs: look for overlapping rectangles, duplicate rooms or pack coverage entered in the wrong unit.
- The price is implausibly low: confirm whether the price field is per pack or per area, then check which optional costs are still zero.
- Changing the pattern changes nothing: review the entered wastage. Pattern selection alone does not choose a new percentage.
- Baseboard seems excessive: check for shared edges between sections of one room, then measure real wall runs and openings.
Flooring pack FAQs
How many packs do I need for a 12 × 10 room?
If those dimensions are feet, the room is 120 ft². With 10% waste and 22 ft² per pack, buy six packs. Different box coverage or a different allowance changes the answer, even though the room stays the same size.
Should I round every room up separately?
The calculator combines the entered areas before whole-pack rounding. That is useful for one matching product across the project. Separate products, deliveries or deliberately reserved room quantities may need separate estimates. Do not combine incompatible packs just because their coverage matches.
Does the calculator allow for herringbone or diagonal cuts?
It applies the wastage percentage you enter. It does not create a cutting layout or decide which offcuts can be reused. Check the pattern instructions and row layout before choosing that allowance.
Does zero estimated surplus mean I have no spare material?
No. The displayed surplus is beyond the requirement that already includes entered wastage. Example 1 has zero surplus but 12 ft² more purchased than the measured floor area.
Can I deduct a kitchen island or fitted cabinets?
Only after confirming where that floor system should terminate. Measure the actual intended flooring area. Do not deduct movable furniture, and do not assume every floating, glued or nailed system follows the same rule around fixed units.
Can I use it for tile boxes?
It can estimate packs from area and stated coverage, but tile work also involves grout, adhesive and the chosen joint layout. Use the tile, grout and adhesive calculator for those additional quantities.
Is the displayed customer price a complete installation quote?
Only if all relevant costs have been entered. The $330 and $440 examples are flooring purchases alone. Removal, preparation, accessories, delivery and installation are not included automatically. For broader pricing, see how to price a handyman job.
What should I check before placing the order?
Recheck dimensions, product code, coverage per box, waste assumptions and the whole-pack count. Confirm the supplier’s current price, availability, batch considerations and return terms. Save the calculation with the product details so substitutions do not silently change your quantities.
Open the free flooring calculator →
Start with your measured room sketch and the exact box coverage, then review the results before ordering.
Featured image: original concept illustration, not a completed Handyman Hub customer project.