


The cheaper insulation pack isn’t always the cheaper way to cover a room. One pack may contain less material, a different thickness or batts intended for a different framing width. Compare the exact product and usable coverage before comparing the price.
The insulation calculator helps turn a specified insulation arrangement into whole packs or rolls. It doesn’t choose the required R-value or wall and roof assembly. Once those decisions are settled, the ordering process becomes much easier: measure the surface, count the specified layers and use the coverage printed for that exact pack.
Read the whole product label
Write down the product reference, thickness, width, length, pieces per pack and coverage per pack. Keep the information together. A screenshot showing only a price and a large R-value leaves out several details needed for a useful comparison.
ROCKWOOL’s Comfortbatt product information distinguishes dimensions, pack quantities and applications. Check the US listing for the product you can actually buy; similarly named Canadian and US options need not have identical pack contents.
For batts, confirm the framing type and clear cavity dimensions. A nominal on-center spacing isn’t the same measurement as the empty space between members. For rigid boards, check the usable board dimensions and any edge detail that affects coverage. Neither format should be selected solely because the total square footage looks right.
Measure the insulation surface, not the home’s floor area
A floor area, exterior wall area and sloping roof area are different quantities. Identify the surface receiving the product and measure that surface. Break an awkward shape into rectangles and triangles, keeping a small sketch beside the measurements.
Decide consistently how framing and openings are being treated. If you’re entering a directly measured cavity area, don’t deduct framing a second time. If you start with a gross wall face, record the deductions used to reach the chosen purchase basis. Keep offcuts and fitting losses in the allowance rather than hiding them in an unexplained area.
The calculator’s direct-area option is useful when you already have a checked takeoff. Its shape options help when you need to build that total. Neither can see an awkward corner or a narrow bay from the area alone, so retain those details on the sketch.
One simple pack calculation
Suppose your measured insulation surface is 360 square feet and the specification calls for one layer. A hypothetical matching pack covers 40 square feet. With an illustrative 5% cutting allowance, allow for 360 × 1.05 = 378 square feet.
Divide 378 by 40 to get 9.45 packs, then round up to 10. You purchase 400 square feet of nominal coverage. Of that, 18 square feet is the entered allowance and another 22 square feet comes from whole-pack rounding. Those aren’t two separate waste percentages to add again.
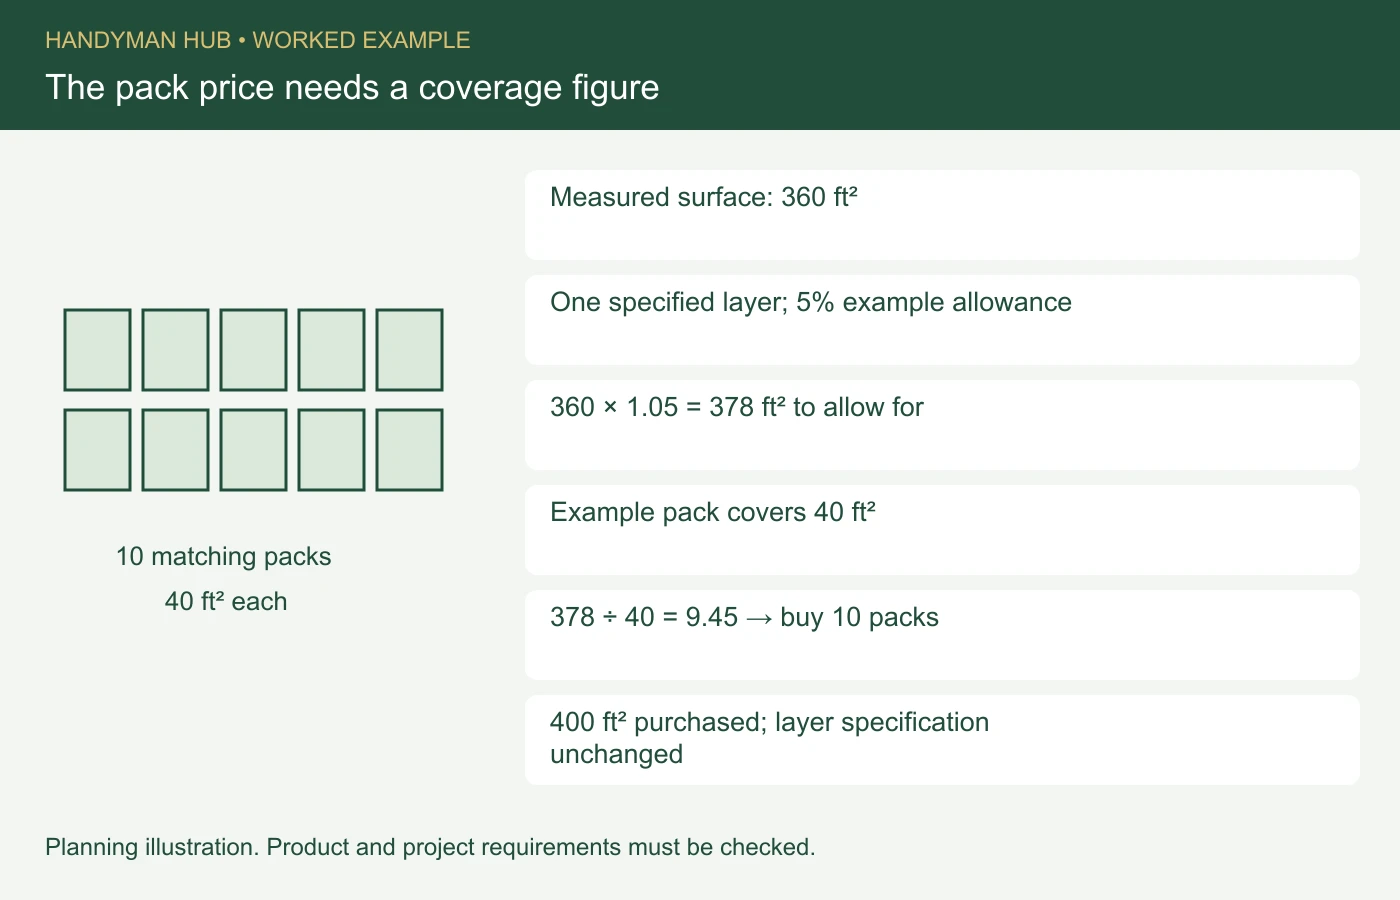
In the live tool, select Imperial, choose labeled coverage for Product A, enter 40 square feet per pack and keep one layer. Enter 360 through Direct measured surface area and use 5% extra. The result confirms ten packs. All dimensions and the percentage in this example are illustrative; replace them with the specified product and your own measured fitting needs.
Thickness and layers do different jobs
Changing the optional thickness field doesn’t automatically change the number of packs. Pack coverage already refers to a particular product at a particular thickness. In the calculator, thickness helps describe material volume; the layer count controls how many times the surface receives that product.
If the specified arrangement uses two full layers of the same 40-square-foot product, the example becomes 360 × 2 × 1.05 = 756 square feet, or 19 packs. Enter the actual layer arrangement, though; two layers aren’t a universal upgrade or a substitute for a properly specified assembly.
Use Product B for a genuinely different product with its own coverage and assigned areas. If it only applies to part of the project, use the area-level layer settings so it doesn’t silently cover everything. Blank inherits the default; zero excludes that product from the area.
Test the awkward pieces before committing to the pack count
Look for narrow bays, corners, short sections around openings and changes of spacing. Can the selected format fit these without leaving unusable strips? If the same awkward cut repeats across the room, sketch it once and multiply its effect rather than hoping a generic allowance absorbs it.
Keep usable offcuts from the same specified product distinct from complete packs already owned. The calculator’s owned-stock field refers to matching whole units. Check their condition and suitability before deducting them; a damaged or different-thickness pack isn’t interchangeable stock.
Don’t squeeze an unsuitable product into a cavity to make an area calculation work. Check the manufacturer’s fitting guidance and the project specification. Coverage, fit and required performance all need to agree.
Compare complete orders
For a purely hypothetical price comparison, ten matching packs at $52 cost $520. An alternative matching format covering 32 square feet per pack needs 12 packs for the same 378-square-foot allowance. At $44 each, that order costs $528. The lower pack price produces the higher material total.
That comparison only makes sense if both options meet the same project requirements. Include delivery, minimum orders and return conditions, and keep any separately specified vapor-control membrane outside the insulation total. For roof work, coordinate the estimate with the EPDM sheet order rather than treating the layers as independent design choices.
Save the insulation breakdown with the product label and surface sketch. When you collect the order, compare the exact product reference and pack coverage—not just the number of packages loaded.
Featured image: original concept illustration, not a completed Handyman Hub customer project.


[…] Insulation Orders […]