The most common equal-spacing mistake happens before the division: counting the wrong number of gaps. Five slats have four spaces between them, but six spaces if both end gaps must match the middle ones.
Use the equal spacing calculator to turn a clear opening, actual member width and chosen end arrangement into a marking schedule. The example below is a decorative wall layout, not a guardrail or stair-baluster design.
Decide what the opening includes
Measure between the boundaries that the slats will actually fill. If a frame or border sits inside the overall opening, subtract it first. If the wall is irregular, record the measurements at the top and bottom rather than assuming that one reading represents the entire space.
Next, measure the visible face width of the slat. Nominal lumber size, thickness and face width are different dimensions. The spacing calculation uses the width occupying the opening when the slat is installed.
Choose the end treatment before calculating. Equal gaps at both ends create one arrangement; members flush with the two boundaries create another. Neither can be substituted for the other halfway through the installation without changing the marks.
Quick check: subtract the combined slat widths from the opening. For n slats, divide the remaining width by n + 1 when both end gaps match, or by n − 1 when the two outer slats sit flush with the boundaries. The flush-end formula needs at least two slats; one centered slat is a separate case.
Five 2-inch slats inside a 48-inch opening
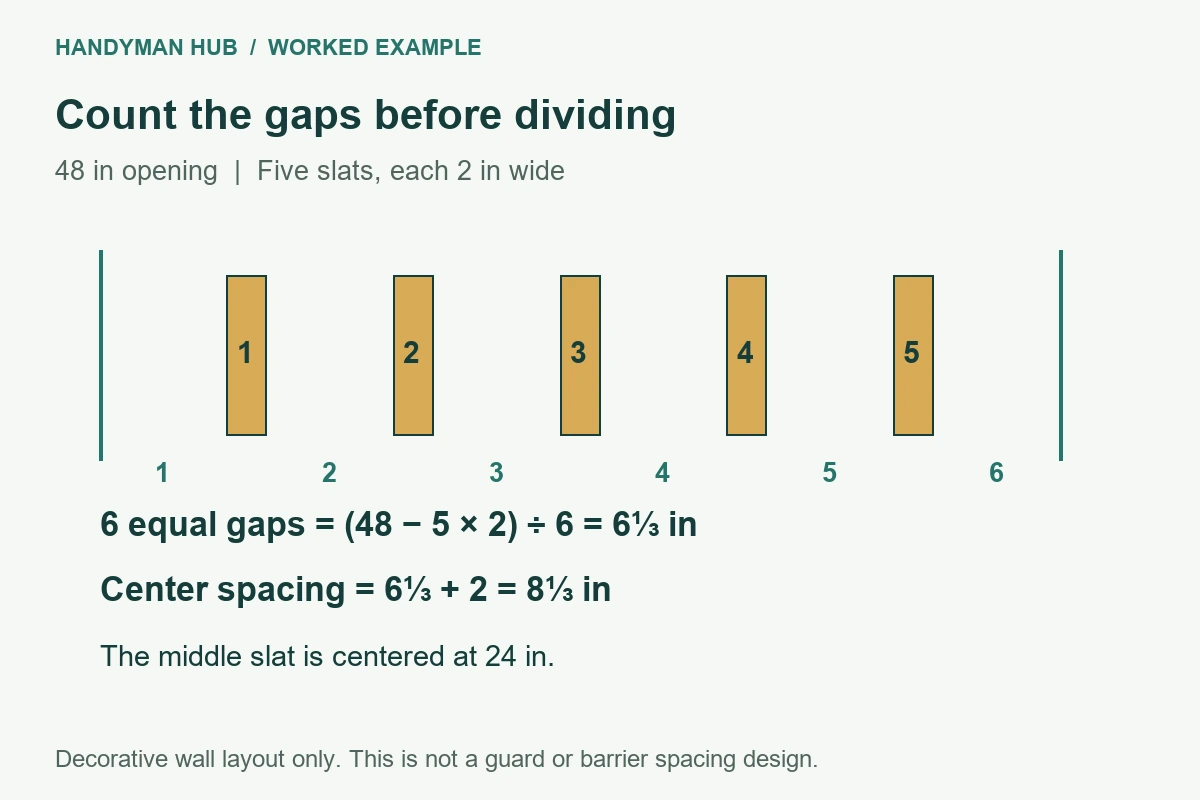
For a simple decorative panel, suppose the clear opening is 48 inches and five finished slats are each exactly 2 inches wide. Together, the wood occupies 10 inches, leaving 38 inches to distribute.
With equal gaps at both ends, divide those 38 inches by six. Each clear gap is 6⅓ inches. The center-to-center distance, or pitch, is the gap plus one slat width: 8⅓ inches. The live calculator displays those values rounded to 6.333 and 8.333 inches.
| Slat | Center measured from the left boundary |
|---|---|
| 1 | 7⅓ in |
| 2 | 15⅔ in |
| 3 | 24 in |
| 4 | 32⅓ in |
| 5 | 40⅔ in |
The first center sits one full gap plus half a slat width from the boundary: 6⅓ + 1 = 7⅓ inches. The central slat lands at 24 inches, which gives a convenient symmetry check. After the last slat, the right-hand gap should match the left.
Why a center mark is not a gap measurement
A clear gap runs from the edge of one member to the edge of the next. Pitch runs between corresponding points, commonly the centers. If you use the 8⅓-inch pitch as the clear opening between slats, the layout will grow too wide.
Label the schedule explicitly: “centers from left boundary,” “left edges from left boundary,” or “clear gaps.” Do not leave an unlabeled column of numbers for someone else to interpret. For a two-person job, agree on the same reference edge before either person starts marking.
What changes when the end slats sit flush?
Keeping the same opening, width and five slats, flush ends leave only four internal gaps. The available 38 inches divided by four gives 9.5-inch clear gaps. The center pitch becomes 11.5 inches, with the outer centers one inch from their respective boundaries.
This is a different pattern, even though the material quantity is unchanged. A quick sketch of both versions often makes the aesthetic choice easier than comparing decimal outputs. If the arrangement feels too open, change the number of members and calculate again rather than squeezing an extra slat into a finished schedule.
Transfer the marks without accumulating error
Keep calculations at full precision until the marking stage. Repeatedly adding a rounded decimal can gradually shift the far end. Measuring each position from one consistent origin makes it easier to catch a mistake before it spreads across the opening.
For this example, the exact thirds do not fall on every common tape graduation. A full-size story stick or carefully checked template can preserve the layout more clearly than a series of rounded measurements. Dry-position the first, middle and last members before fixing the whole set.
Repeatable references are also useful in other workshop tasks. Woodsmith’s precision drill-press fence shows an indexed stop arrangement for regularly spaced holes. Its jig serves a different job, but illustrates why a controlled reference is more reliable than improvising each repeated position.
Keep decorative layout separate from safety requirements
Do not reuse the large decorative gaps in this example for a balcony guard, stair railing, pool barrier or children’s enclosure. Those applications have their own opening, strength and installation requirements. An evenly spaced pattern can still be unsuitable for its purpose.
If you have an approved maximum opening, use the relevant calculator mode and enter the actual project requirement. Then review end gaps, angled geometry and construction tolerances as well as the displayed middle gap. The arithmetic does not approve the complete assembly or its fixings.
Use the member count for the material estimate
Once the layout is settled, record the number and finished length of the slats. The lumber calculator can turn those identical parts into stock boards. If a panel forms the backing, check it with the sheet cutting planner. For a mitered decorative frame, calculate its corner settings separately; equal spacing does not establish the frame’s angles.
Related project planning
For a different kind of repeated-board layout, see the deck board direction guide for a worked comparison of board orientation and the final edge strip. Decorative wall spacing and deck-board gaps serve different purposes, so carry over the measuring discipline rather than the gap dimensions.